Enchantment Learning & Living Blog

Welcome to Enchantment Learning & Living, the inspirational space where I write about the simple pleasures, radical self-care, and everyday magic that make life delicious.

Homemade Beeswrap

IMG_4857.jpg

During my year of buying, using, and wasting less, I focused on reducing my plastic use. I got rid of one-use items and found other methods of storing things, rather than relying on plastics. It wasn’t as hard as I had thought, mostly because I’d stopped using things like plastic wrap several years prior and already reused things like yogurt cartons and other plastic containers (hey, use what you’ve got—it’s better than throwing it out!).

I’d even invested in a few beeswraps over the years, too, although they were pretty expensive to invest in—typically around $20 for three or so beeswax-sealed cloths. So what’s a bruja to do when she’s wanting to find eco-friendly wrappers but not spend a small fortune? You guessed it: Make her own. I went down a Pinterest rabbit hole and found so many easy-to-follow recipes and discovered that not only is making your own beeswrap super easy, it is very affordable. I still have plenty of the ingredients and cotton fabric for when I want to make more—and that ways after making the green living equivalent of a deluxe Tupperware set for two families!

I spent the most money on fancy fabric because I couldn’t help myself! Who can resist avocado or cherry print cotton when you know you’re turning them into useful—and cute—kitchen tools? Plus, I’m a sucker for bright colorful prints in general, from dress patterns to beeswrap, it would seem. Still, you wouldn’t have to do the same. Any old cotton fabric will do as long as it is washed and ironed before you begin their beeswrapping transformation. That’s where the fun begins.

I can’t tell you how much fun I hade making these things. Part of the joy of sustainability is sharing with your family. Last holiday season, I made my family members large sets of beeswrap since I know they, too, are working on better green living practices, but don’t necessarily have the time to whip up a batch of homemade beeswrap. They're better for the environment—and the pocketbook, when making them yourself—and they become a gift that is truly a labor of love.

I have many a fond memory of wintery afternoons spend preparing these reusable wraps by twinkle lights and festive holiday decorations. My home was redolent with the smell of honey and pine for days after. I poured all the softness of honeyed thoughts in the making of them, along with the resiliency of pine resin, both things everyone needs for a new year. I sealed them with my love and the soft healing nourishment of time spent in the kitchen. If that doesn’t welcome in the holiday spirit, I don’t know what does!

Rather than walk you through each and every step I did to make these, I’m leaving you in the good hands of Mommypotomous. I used this recipe because I preferred how she sprinkled the ingredients directly on the cotton, which to me felt easier than melting them separately and painting them on, as Attainable Sustainable did. I also read about the pros and cons of using different ingredients, including vegan options, from Rose Mountain Herbs. They offer quite a few pro tips, too, for getting the exact kind of wrap you want.

IMG_4793.jpg

My supplies: cotton fabric in fun colors, beeswax pastilles (they are easier to use here, providing even coverage), pine resin for stickiness, and jojoba oil to combine the ingredients and serve as an anti-bacterial agent.

IMG_4805.jpg

Washed and ironed cotton cut to size on baking sheets lined with parchment paper. These cotton pieces, with beeswax, pine resin, and jojoba oil, are ready for the oven.

IMG_4795.jpg

These cotton squares are fresh out of the oven and have been brushed to even out the melted ingredients over their surface. Be warned: once they go in the oven, they melt fast and, when you take them out, they harden quickly, so you have to act fast. But don’t worry, you can always pop them back in the oven if you need to reheat them to spread the beeswax mixture around more.

One other little tip: remove the cloth from the baking sheets while they are still warm. If you let them cool on the baking sheets, the excess beeswax mixture will stick to the back of the fabric.

IMG_4858.jpg

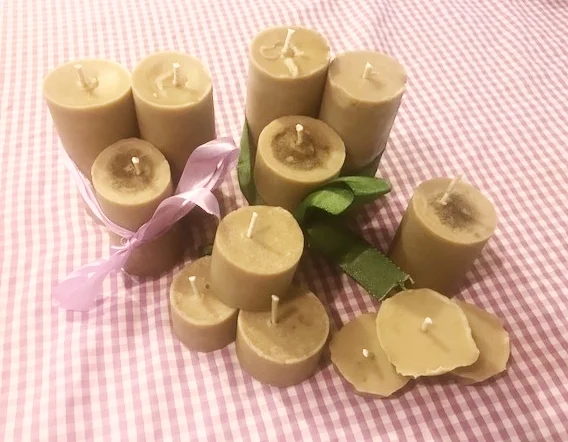
The final product! These are great for storing dried goods like doggie treats or snacks on the go, to larger items. The great thing about making your own beeswax wrappers is that you get to choose the size and quantity. I made a variety for me and mine, from small ones, pictured above, to larger ones to wrap up leftovers to everything in between, pictured below. Plus, over time, when your beeswax coat beings to wear off, you simply pop them back in the oven with a little extra beeswax, resin, and oil and let it reseal itself.

IMG_4853.jpg

In the end, me and mine have a gorgeous collection of reusable wraps. Every time I use them, I think of those cozy festive afternoons and warming smell of pine and honey.

Enchantment Learning & Living is an inspirational blog celebrating life’s simple pleasures, everyday mysticism, and delectable recipes that are guaranteed to stir the kitchen witch in you. If you enjoyed what you just read and believe that true magic is in the everyday, subscribe to my newsletter below for regular doses of enchantment. Want even more inspiration? Follow me on InstagramFacebookPinterest, and Twitter. Here’s to a magical life!

Homemade Lip Balm

After all these years—and the countless body butters, scrubs, and makeup items I’ve posted about—I realized I have never once given a recipe for lip balm. Loco! Especially since this is one that I make pretty regularly and one of the first things I learned how to make all those years ago when I was a young girl watching my mom concoct all sorts of cool potions and lotions in our family kitchen.

I love this recipe for so many reasons. It’s inexpensive and easy and keeps your lips kissably soft. I reused my old chapstick tubes or pretty lip balm tins to make them. It’s a great way to avoid mindless consumerism especially if you are participating in Plastic Free July and trying not to buy things with unnecessary packaging. It’s also less expensive to reuse what you have.

And speaking of less expense, instead of paying $1-3 dollars for a small tube of chapstick everyday time I go to the store, I now spend roughly $2 on making over half a dozen lip balms! Plus, I know the ingredients in it and can tailor it to my preferences, which includes plenty of beeswax to seal in moisture.

It takes all of twenty minutes to make—and most of that is spent waiting for the wax and oil to melt and then, once poured into the containers, for them to cool. I make a big batch every few months. My measurements are rough guesstimates. I’ve been making lip balm for so long I’ve gotten pretty good at eyeballing what I need for how many containers. The measurements here will give you a big stash of lip balms to carry around, something I like because I use a lot—and keep some in all the rooms of the house. But you can always cut the recipe in half if you don’t want that much. I add shea butter to my recipe because I find it really helps to soften and hydrate lips. I avoid using essential oils or other scents, because it is on my lips. I also enjoy the soft honey scent it gets from the beeswax.

Ingredients:

1/4 cup shea butter

1/4 cup coconut oil or olive oil

1 tablespoon grated beeswax

Special tools:

saucepan

clean BPA free tin can or other heatproof bowl

cleaned old chapstick tubes or lip balm tins

Directions:

  1. Place the saucepan on low heat and fill halfway with water. Then place the clean tin can in the center of the saucepan. Put the beeswax in the tin can and let melt slowly.

  2. When beeswax is melted, add oil and shea butter. Let sit until combined, about 5-10 minutes.

  3. While oil melts, set up chapstick tubes, making sure that the tube is wound all the way down. If you’re using only tins, make sure they are open.

  4. Remove oil and beeswax mixture from heat and pour into lip balm tubes or tins.

  5. Let tubes or tins sit until the mixture is set, about one hour.

  6. Enjoy! Makes roughly six tubes or tins.

IMG_6950.jpg

Enchantment Learning & Living is an inspirational blog celebrating life’s simple pleasures, everyday mysticism, and delectable recipes that are guaranteed to stir the kitchen witch in you. If you enjoyed what you just read and believe that true magic is in the everyday, subscribe to my newsletter below for regular doses of enchantment. Want even more inspiration? Follow me on Instagram, Facebook, Pinterest, and Twitter. Here’s to a magical life!

Healthy & Happy Face Toner

One of the joys of a year of sacred simple pleasures has been retooling my beauty routine. I got a fancy new hair cut that makes me feel fabulous. I’ve been doing bi-weekly honey facials (homemade of course!). And I’ve been giving myself regular DIY mani-pedis, without the nail polish since I’ve discovered that I don’t like it as much as I think I do. An earth woman like me spends a lot of time getting her hands dirty and walking around barefoot—not great for polished nails! Still, I like the time and energy I’ve been giving to pampering myself.

In what seems like a self-care cliche at this point, I light a candle, turn on an audiobook, and proceed to indulge in some of the more luxurious forms of taking care of myself. I’m no stranger to the harder forms of self-care—eating right, exercising, limiting stress—but I’ve begun to learn that the softer forms are important too.

I get to feel pretty. And, I’ve found, I like to feel pretty! Like reading romance novels, doing these little seemingly vain self-care things makes me feel like I’m more than a to-do list or a job. I get to be a woman with her own desires and hopes and dreams…corny, I know! But it’s nice to feel like I’m taking care of a part of myself that has nothing to do with my day job (much as I love it). It’s my time for me and me alone, with no outcome except that it makes me feel good.

One of my favorite part of this new beauty regimen has been this Healthy & Happy Face Toner that uses Vitamin C to brighten and tighten skin. I started concocting this new toner after reading an article about how important it is for us bronze-skinned women to include Vitamin C in our skin routine as it helps with sunspots and evening skin tone. It also reduces signs of aging and can stimulate collagen production. I wish I could remember where I read this, so I could provide a ink, but, as one of the delights of this new beauty routine includes reading more beauty magazines (the more natural the better!), I can’t recall where or when I got this information. Ops!

Still, since I’ve incorporated Vitamin C into my toner, my skin has been brighter and softer. Once again, I got inspiration from Wellness Mama, but instead of using witch hazel, I opted for apple cider vinegar, since I find using it in its watered down form has always worked well as a gentle face toner. The vinegar helps balance the ph of your skin and is anti-bacterial. Notice I said watered down, however. Both apple cider vinegar and Vitamin C are acids, which means a little goes a long way. You never want to put undiluted forms of these on your skin as it will be WAY too harsh. So be gentle with yourself and use only watered down versions of each.

I learned from Wellness Mama that Vitamin C (see link below for where to get it) degrades over time so small batches and refrigeration tend to be better. I make a bigger batch myself, since I typically share it with the women in my family. I also sometimes add clove oil for it’s anti-bacterial priorities and to soften the smell of the vinegar. That said, the essential oils are entirely optional—just be sure not to use more than 10 drops, because again, they can agitate the face if they are not properly diluted.

The best part about this toner? It takes less than ten active minutes to make!

Ingredients:

1 tsp Vitamin C powder

1/2 cup water

1/4 cup apple cider vinegar

10 drops clove oil (optional)

Heat water in microwave until almost boiling, about two minutes. Stir Vitamin C power into hot water until dissolved. Allow to cool, approximately 20 minutes. Then add the apple cider vinegar and stir. Store in small mason jar or petite spray bottle.

To use, wash face thoroughly then dip (ideally reusable!) cotton swab in liquid or spray toner onto swab into moist but not overly wet. Wipe face with cotton, spending a little extra time on oily or problem spots. Let dry then apply moisturizer of choice.

Makes 3/4 cup. Use within the month or keep in fridge to extend the shelf life. Enjoy!

….just add water!

….just add water!

Enchantment Learning & Living is an inspirational blog celebrating life’s simple pleasures, everyday mysticism, and delectable recipes that are guaranteed to stir the kitchen witch in you. If you enjoyed what you just read and believe that true magic is in the everyday, subscribe to my newsletter below for regular doses of enchantment. Want even more inspiration? Follow me on InstagramFacebookPinterest, and Twitter. Here’s to a magical life!

Composting 101 Resource Guide

Every April I begin a series of Earth Day posts, usually involving tips on greening your routine or various friendly recipes. This year, however, I discovered a funny, wondrous thing I began preparing for April 22nd: All my blogs and social media posts reflected my deepening commitment to a green lifestyle, regardless of the time of year. Woohoo!

I’ve been going more and more green, especially now with the heartbreaking news on climate change. But what used to be a series of posts once a year on how I do that has become regular reflections on how a more zero-waste lifestyle is an integral part of who I am day-in, day-out. More than that, my work, be is something as specific as my regular-ish #SustainableSaturdays posts on Instagram, or as broad as a new blog or short story, reflects how intrinsically my sense of wellbeing is tied to tending my relationship with nature, from dramatically reducing my plastic use to planting my radish seeds.

If I don’t feel like I’m actively doing my part to fight climate change, then I don’t feel like I’m living a healthy, whole, balanced life. It’s kind of like eating fast food and wanting to be healthy at the same time. Not gonna happen! Okay, so lest I start sounding to preachy, I’ll just wrap up this rant by saying that as I’ve slowed down and tended my relationship with nature, I’ve likewise tended my relationship to myself. Together, we heal, bloom, thrive…

…which is all by way of saying that one of my day-in, day-out green living routines is tending my own vermicompost right on my own little garden patio. I started doing it a few years ago when I realized how many food scraps and odds and ends I threw out. Actually, I grew up in a home with a lush wild garden and an active compost, but, apartment dweller that I am, I just assumed good old fashion composting was something that would have to wait for a real home and a real backyard.

Not so.

After realizing I could be reducing the food waste that goes to landfills relatively simply, I decided to invest in a vermicomposting tray (FYI vermicompisting is just a fancy term for composting with worms in trays or tubs). I consulted my mom. I talked to my hippy friends. I went down an internet rabbit hole. Each and every source told me that composting, especially from bins or trays, was something I could easily do, even from my humble apartment, without attracting rodents or committing to a super labor intensive practice. Cut to me a few years down the road with a flourishing compost, happy plants benefiting from the fertile soil, and more worms than I know what to do with.

My waste has declined dramatically too. I keep my food scraps in a tupperware bin in the fridge and, once a week or so, take them out to the compost to feed my worms. I now shred paper mail and happily spread it around my vermicomposting trays as welcome roughage for the little guys. It’s incredibly rewarding to see what is essentially trash or discards find a new life feeding plants. If you want to go full garden-nerd about this, the worms and fresh compost make great gifts for your fellow gardeners. Also, let’s be real: My writer-heart sees a big whopping metaphor in the whole act of taking things that no longer serve us and making them the foundation of future fertility.

So how did I do it? By consulting the following resources listed below (along with that of y green-thumbed mom). I thought about writing my own composting guide, but, honestly, these sites do it better. Without further ado, here’s my resource guide for all things composting:

  1. Sustainable Baby Step’s Beginner’s Guide to Composting has everything you could possibly need, from how to get started, to what you can and can’t compost, to what to do with all the wonderful soil once the worms have had their way with your food scraps.

  2. Food Print’s Vermicomposting 101: is a thorough set of instructions for how to set up your compost and make it friendly.

  3. Eco-cycle’s troubleshooting section is especially helpful if you are running into issues like having a smelly or wet compost. They can tell you why what’s going on and how to fix it.

  4. Green Action Center’s FAQ is another fantastic primer on all things composting, including why it sometimes looks like nothing is happening (but really it is).

This Earth Day, commit to reducing your food waste. Commit to taking things that would otherwise end up in landfills and turn them into gardener’s gold. Feed worms. Grow vegetables. Be one with nature. Happy gardening and happy composting!

P.S. Who wants worms?

IMG_2224.jpg

Enchantment Learning & Living is an inspirational blog celebrating life’s simple pleasures, everyday mysticism, and delectable recipes that are guaranteed to stir the kitchen witch in you. If you enjoyed what you just read and believe that true magic is in the everyday, subscribe to my newsletter below for regular doses of enchantment. Want even more inspiration? Follow me on InstagramFacebookPinterest, and Twitter. Here’s to a magical life!

Homemade Doggie Treats

When I say I like to make gifts for everyone in my family, I mean everyone, including the pups. (Okay, okay, lest that last statement sound too Martha Stewart-y, I should say that I’ve got a small family and we’re all pretty chill about the gift thing—but it’s still fun to treat them to some creature comforts!). I’m auntie to several cute doggies and friends with many a lovely dog owner and I love to spoil our four-legged friends with some easy and healthy treats this time of year. Bonus: making my own treats means not purchasing things with wasteful packaging, yay!

IMG_4812.jpg

I modeled my recipe from one by Bitz & Giggles because I loved how adaptable versatile it was (also easy, because…you know me). The pumpkin puree can easily be swapped out for apple sauce, as my experiments have proved, and I’ve incorporated many a batch of apple-studded and chia-seed smattered oatmeal that I knew I wouldn’t be able to finish into these treats. I’ve even added yogurt in a pinch. I omitted the nutmeg and cinnamon, because, as their recipe states, those spices can be harmful to dogs in large amounts, so I didn’t want to mess with it. I also added a mix of white and wheat flour—enough to soak up the extra moisture from the cook oatmeal I mixed in.

You are not required to buy a doggie bone cookie cutter to make them. I did just because I think it’s cute and because I once tried to use festive holiday cookie cutters…but everyone kept mistake the doggie teats for human cookies. Ooops! You can slice the dough into squares if you want or use less human-being-y cookie cutters (or just be prepared for people to gobble a few of these healthy treats too).

You'll notice my recipe is a little iffy on the ingredients because I’m all for using what you have on hand. I make a bigger batch so I have plenty to give out, but you could always cut it in half. See what I mean about versatile? I would still cook them for a solid 40 minutes so they harden like a traditional doggie biscuit. I only did 30 minutes for the first round and they came out cookie-soft. Play with it and see what works best for you. All in all, these are fun to make and share with you furry friends. Plus it is super easy to whip up before the holiday celebrations and pop into the freezer for later gift-giving.

Ingredients:

1 cup canned pumpkin (or apple sauce)

1 cup water (or yogurt)

1/4 cup olive oil or coconut oil

1 cup oatmeal

4 cups white or wheat flour

Preheat oven 375. Pour wet ingredients in bowl and stir until combined. Then slowly add flour and oats until dough forms. If you’re trying to use up already cooked oatmeal like I did, then just mix it in with the wet ingredients, and add the flour after. Roll out to 1/4 inch thickness on floured surface and use your cookie cutter or knife to create shapes. Place on baking sheet and bake for 40 minutes. Serves an entire pack of wolves. Enjoy!

IMG_4813.jpg

Enchantment Learning & Living is an inspirational blog celebrating life’s simple pleasures, everyday mysticism, and delectable recipes that are guaranteed to stir the kitchen witch in you. If you enjoyed what you just read and believe that true magic is in the everyday, subscribe to my newsletter below for regular doses of enchantment. Want even more inspiration? Follow me on InstagramFacebookPinterest, and Twitter. Here’s to a magical life!

Homemade Mineral Foundation

I don’t wear a lot of makeup and lately, I’ve been going more and more natural.  When I do wear makeup, I want it to be as organic as possible.  The only issue with that, of course, is that organic makeup can be super expensive and still full of yucky ingredients. It’s better than the drug-store makeup but when I learned that many brands sneak in various preservatives and no-no additives to products that are supposed to be cleaner than your average makeup. 

That got me thinking: why am a paying a small fortune for “organic” makeup if it isn’t as pure as I thought?  I’ve also become more aware of the waste involved in buying tiny one-ounce products and then having to throw away the used compact or jar once I’ve used up the foundation.  I am trying to buy, use, and waste less this year, after all.  

Sure, I could go makeup free, but sometimes I need a little coverage.  It’s akin to putting on armor for a workday or adding a touch of glamour when I want to go out and feel pretty.  Then it hit me: I’ve gone full-on hippy homemaker in the past and made my own mascara and bronzer, so why not make my own foundation?  It would be cheaper, less wasteful, and I would always be sure I got the right tint.

Let me tell you right now that this journey has been a process.  I started with recipes I found online that said you could make your own foundation using only arrowroot powder and kitchen spices.  Sold!  How much more natural could a woman get?  Alas, if it sounds too good to be true, then it probably is.  I tried various recipes, various amounts of cinnamon, nutmeg and arrowroot powder, and it still always came out looking like I had dusted spices on my face.  At least I smelled like freshly baked goods!

That’s when I turned to mineral makeup.  Technically, you can’t call anything like minerals that are pulled from the earth organic, because we can’t control the elements. It’s kind of like the same way you can’t call fish organic, only line-caught, because, as they swim around in the ocean, they can come into contact with all sorts of matter.  Still, it’s as natural as you can get—like the bronzer I made. 

Some people worry about using titanium dioxide in this mix, but I figure if it’s in the store-bought mineral products I buy and wear, I should be fine.  It’s the unpronounceable things on the list of ingredients that worry me. From what I found on my research, the only danger in titanium dioxide is in using the nanoparticles version where the particles are so small you can absorb more than is good for you, similar to how you should always use non-nano zinc oxide for your homemade sunscreen.  

Okay, enough of the technical talk!  Let’s get to the recipe.  I love it!  It took me all of ten minutes to make and looks and feels wonderful.  There’s an initial investment in buying bulk supplies (I spent roughly $60 on ingredients).  But once you have them, you’ll never have to get more for a VERY long time (and FYI, the ingredients never go bad).  I adapted my recipe from Natural Organic Products & Recipes and The Humble Homemaker.

I cut my portions in half because I like working in small batches until I know how something will work out.  Even with my half-batch, I used a few dollars worth of the ingredients and ended up with several ounces of makeup—at least ten times the amount of the small jars and compacts that you shell out $25-$40 for.  What?!  I know.  Totally worth the investment.  At this rate, my half batch will cover me for a few years and then I have plenty of raw ingredients for when I need more.  Dare I say that my $60 investment will last a lifetime?  Maybe not that long, but it sure beats shelling out half that every six months for an ounce of makeup in a container I ultimately have to throw away.  

The last thing I’ll say about this is that, of course, not all skin tones are the same.  My recipe is for olive skin tones, but this fabulous website has the list of ingredients and measurements you’ll need for other skin tones.  Play with it to see what works for you.  I ended up leaving out the clay in their instructions as well as a few other ingredients from The Humble Homemaker because they didn’t feel necessary to me.  Do make sure to purchase a coffee grinder that you use ONLY for makeup and similar DIY products and be careful not to breathe in the ingredients while you mix them (I like to tie a damp cloth around my nose and mouth to be safe).  

Ingredients:

5 tsp titanium dioxide

1/2 tbsp serecite mica

2 tsp zinc oxide

1/2 tsp magnesium stearate

3/4 tsp brown iron oxide

1/8 tsp deep red oxide

5 tsp yellow iron oxide

Mix ingredients in bowl reserved only for makeup and similar DIY projects.  Stir until combined.  Then, in small batches, blend in coffee grinder (again, making sure that this is one you use only for these types of projects).  As you finish each batch, pour into reusable container like a mason jar.  Shake jar to combine each batch you’ve run through the coffee grinder.  Store in a cool, dry place. 

To use, place a small amount in an old cosmetic container and, using your blusher, dust your face with desired amount.  If you don’t have a small container that you can reuse, simply keep in the foundation in the larger jar and be sure to shake the blusher before applying to remove any excess powder.  

Note: If foundation looks too dark, add more titanium dioxide in small amounts.  

Makes roughly 8 oz

IMG_3710.jpg


Enchantment Learning & Living is an inspirational blog celebrating life’s simple pleasures, everyday mysticism, and delectable recipes that are guaranteed to stir the kitchen witch in you. If you enjoyed what you just read and believe that true magic is in the everyday, subscribe to my newsletter below for regular doses of enchantment. Want even more inspiration? Follow me on InstagramFacebookPinterest, and Twitter. Here’s to a magical life!

Homemade Shampoo & Facial Cleanser

It’s official, I’ve gone off the hippy-DIY deep-end.  Actually, it happened a long time ago when I started making my own shampoo and facial cleanser!   I know, every time you think I couldn’t possibly be any more tree-huggery, I confess that I’ve been doing something like making my own shower products for years.

I started for a multitude of reasons, the biggest being that I have thick crazy hair that doesn’t respond well to most conventional shampoo products and sensitive skin that gets easily irritated with the various chemicals used in most facial cleansers and soaps.  Even when the organic specialty products promised extra-hydration for dry locks or gentle formulas for sensitive skin, none of it worked.  I ended up spending a small fortune on organic products that did nothing for me but give me brittle hair and dry skin.

I’ve learned over the years that simpler truly is better.  Tired of expensive, useless products, I finally tried this very simple recipe from who knows where (it’s been long enough that I can’t actually remember how I got started on this, probably from a magazine or book):  Diluted castile soap with your choice of essential oils. 

What?! That’s it? Yup.

I tried it over five years ago and have never gone back.  Gone are the pile of shampoo bottles and jars of face soaps clogging my shower caddie and putting a dent in my wallet.  Instead, I have two repurposed honey-bear bottles—the large one for shampoo and the smaller for my facial cleanser. 

Since I’ve switched to using castile soap as the foundation for both my shampoo and face soap, my skin is happier and my hair more hydrated.  The trick is to make sure that you are, in fact, properly diluting castile soap.  One of the things that can make Dr. Bronner’s soap seem expensive is that it is highly concentrated, which means it should never be used without diluting it.  Once you do that, you understand that while it can seem pricey, a little goes a very long way! 

Another perk to this recipe is that is reduced the amount of packaging you buy then throw out—so say goodbye to the wasteful packaging of all those shampoo bottles!  Repurposing old bottles and purchasing castile soap in bulk from your local co-op, using your own container to fill up, lets you go that extra mile in waste reduction.  When all is said and done, you end up spending mere pennies on shampoo and face wash.  

The only real difference between the shampoo and face wash is the amount of essential oils you put in.  Because the skin on your face can be very sensitive, only use 5-10 drops in your mixture.  That’s enough to get the healing benefits of the oils without an irritation.  For your shampoo, you can use more.  When in doubt, use less essential oils than you think you need.  Like the soap, a little essential oil goes a long way!

Last but not least, I have a few optional ingredients you can throw in for an added boost of nourshiment and cleansing, but they aren't necessary.  Experiment and see what works for you.  That's half the fun of DIY-ing your beauty routine, after all! 

Basic Ingredients:

Castile soap

Water

Optional Ingredients: 

Essential oils of choice

Honey

Activated Charcoal (for facial cleanser only)

Olive Oil (for shampoo only)

For Shampoo: 

Combine 1/4 cup castile soap with 1 cup water.  Add 15-20 drops essential oil of choice.  I like to use rosemary because it makes your hair shinier, peppermint, or cinnamon to boost growth (it also smells really nice!).  If that said, if you have sensitivities to scents, you can always omit the oils.

Other things you can add to your shampoo are honey (approximately 1/4 cup) or olive oil (1/4 cup) to hydrate your locks and help them retain moisture.  (If your hair is very dry, consider using my Goddess Hair Mask once a week.)

Combine ingredients in your repurposed container and shake until combined.  To use, pour desired amount on wet hair, lather, rinse, and repeat.

Makes approximately 1-1 1/2 cups.

For Facial Cleanser:

Combine 1/4 castile soap with 1 cup water.  Add 5-10 drops essential oil of choice.  I love clove oil because it is anti-bacterial.  You can add a teaspoon of honey to lock in moisture and provide additional anti-bacterial help.  Or you can mix in a teaspoon of activated charcoal to clean pores and purify skin. 

Combine ingredients in your repurposed container and shake until combined.  To use, pour a dime sized amount into your hand and gently massage into wet face.  Rinse.  

Makes approximately 1 cup.

Enjoy!

IMG_3706.jpg

Enchantment Learning & Living is an inspirational blog celebrating life’s simple pleasures, everyday mysticism, and delectable recipes that are guaranteed to stir the kitchen witch in you. If you enjoyed what you just read and believe that true magic is in the everyday, subscribe to my newsletter below for regular doses of enchantment. Want even more inspiration? Follow me on InstagramFacebookPinterest, and Twitter. Here’s to a magical life!

Homemade Beeswax Candles

I love beeswax.  I use it in everything, from my body butters and lip balms to salves and mascara.  It acts as a sealant in my beauty goodies, locking in moisture and providing a protective layer against the elements. Plus it smells divine!  Like honey and warm earth. Best of all, buying local beeswax supports the bees which we need for a thriving planet and happy garden.

Homemade Beeswax Candles

I've fallen in love with beeswax all over again, recently, after I began making these homemade candles.  I adore candles.  Their dancing light turns dinner into a celebration or nighttime reading into a cozy retreat from the world.  Their open flames seem made for whispering wishes into and their warm glow chases away the darkness like no lamplight can. In short, they are one of my sacred simple pleasures.  I enjoy the homey task of making them, especially last week, as I cleaned and prepared my home for the coming summer solstice and enjoyed a candlelit night once the sun set on the longest day of the year.

Beeswax candles are one of the purest candles out there, free from yucky chemicals and artificial ingredients of mainstream candles. They have the added benefit of purifying your home.  While most candles actually release toxins into the air while they burn, beeswax candles release negative ions as they melt which neutralizes the positive ions create by allergies and other pollutants.  Bonus: It makes your home smell like amber, soft and sweet, like the honey it comes from.

These homemade candles are ridiculously easy to make, as are all my recipes, natch.  I prefer to use old toilet paper rolls for pillar candles and egg cartons for tea lights, rather than pouring them into jars.  The jars are nice, but I hate the build-up of candle containers; plus, I just love the look of pillar candles. Feel free to use jars if you prefer them (or reuse old candle tins).

These candles make wonderful gifts.  I like to make a big batch since they are so easy to make, to have on hand for last-minute gifts or give to my family.  Once the wick on your candle has burned down, don't throw the wax out! Use it to make new candles.  Beeswax is super durable and long-lasting, so you can just keep reusing what doesn't get burned up.  This recipe also works well for any candle wax you've got lying around.  I melted down one of my favorite chakra candles and refashioned it into a new one.  It beats spending a small fortune on new candles!

I've made my beeswax candles two ways: with just the beeswax and with a little coconut oil thrown it.  The pure beeswax candles emit a softer, lighter glow, while the ones with coconut oil burn brighter and faster.  If you use a jar, you will for sure want to use coconut oil so that you can more easily remove leftover wax once the candle is done burning.

Ingredients:

Beeswax, preferably local

Coconut oil (optional, using only 1 part oil to 4 parts beeswax for best consistency)

Special Tools:

Toilet paper or paper towel rolls

Egg cartons

Large tin can

Old saucepan

Organic candle wicks

Parchment or wax paper

Baking sheet

Skewers or string (to keep wicks straight)

To make, roughly chop wax and place in the large tin can.  Fill saucepan halfway with water and place on stove.  Put can in saucepan.  Burner should be on medium heat.  Stir occasionally until wax melts. The time on this varies, depending on how much beeswax you use and how small the wax pieces are. It will take at least twenty minutes. I typically put it on when writing so it can melt while I work.  

If you are using coconut oil, melt it in a separate tin can only once your beeswax is melted, as the coconut oil melts more quickly.  Once it's melted, combine with the wax and stir. 

Remove melted wax from heat and let sit about five minutes to cool.  While your wax (and coconut oil, if you are using it) is cooling, spread parchment paper across a baking sheet and line up your paper rolls.  You can also use the bottom of an egg carton if you want smaller candles. 

To make candles, pour a dime-sized bit of wax into the bottom of the rolls sitting on parchment paper or in the egg cartons.  Then place the metal bottom of your wicks into the wax.  This will serve as a solid base. Once you've done it for all your candle molds, line one or two skewers or other straight objects across the middle of your rolls (or carton) so that your wicks are neatly sandwiched between them.  This will ensure that they stay centered.  For smaller candles, simply cut the desired wick size and place it in the cooling wax. 

Candle Making Process

Pour wax slowly into molds.  Note: If the wax isn't cool enough, it may leak out of bottom rolls, so make sure it has enough time to cool.  I forgot to the first time I made these and had wax puddles forming outside the molds--luckily I could just let it harden, scrape it off, and remelt it!  

Wax in Egg Carton

Once the beeswax is poured into the molds, let them sit until hardened, usually an hour or two.  I keep them on the baking sheet so that I can move them someplace where they won't be in the way.  Once they've hardened and cooled, simply peel away the carton or roll and you've got yourself a lovely collection of beeswax candles!

Finished Candles

Enchantment Learning & Living is an inspirational blog celebrating life’s simple pleasures, everyday mysticism, and delectable recipes that are guaranteed to stir the kitchen witch in you. If you enjoyed what you just read and believe that true magic is in the everyday, subscribe to my newsletter below for regular doses of enchantment. Want even more inspiration? Follow me on Instagram, Facebook, Pinterest, and Twitter. Here’s to a magical life!

Homemade Bug Repellent ~ Just Say No to DEET

A couple weeks ago, I was enjoying a glorious summer evening in the backyard with my family. We indulged in a luxurious meal on the patio and then played with my little niece long after the sun went down.  It was the perfect embodiment of the season...

...then I got home and found that I was covered in mosquito bites!  It seems like there are more of these pesky insects this summer than in previous ones.  Yuck!  It was time arm myself with my Homemade Bug Repellent.  This all-natural, non-toxic spray is perfect for stashing in your picnic tote or spritzing on before some late-night stargazing...or any other time you want to frolic in the wilderness.  Why do I prefer to make my own bug repellent?  The answer is two-fold: I have all the ingredients readily on hand (many of them are also used for my homemade body butters and other goodies) and I've long since given up on the toxic DEET (see what Wellness Mama has to say about how this chemical spray negatively impacts the environment and your body).

I whipped up a pretty basic recipe after looking at others from Scratch Mommy, Thank Your Body, and Wellness Mama.  I used vegetable glycerin to as a binding agent rather than oil and mixed it with what essential oils I had on hand.  The glycerin binds the water and oils together and ensures that the spray sticks to your clothes and skin.  The key factor here in keeping away bugs is the strong scents of the essential oils so you will want to reapply every hour or so to keep the scents strong.  I used citronella--a common ingredient in natural bug sprays--and lemongrass. (Both of these plants can also be grown in your garden as a natural herbal repellent FYI.)  I love the citrusy scent!  You can also add in other essential oils like eucalyptus or lavender.  The measurements here are for a 4oz spray bottle.

Ingredients:

Water

1 tablespoon vegetable glycerin 

30 drops citronella essential oil

30 drops lemongrass essential oil

Mix glycerine and essential oils in a 4oz spray bottle, then fill bottle to the top with water.  Shake well.  Apply regularly (at least once an hour) when you plan on being outdoors.  What more homemade bug repellent ideas?  Check out the Prairie Homestead's list of natural bug spray recipes.  

Enchantment Learning & Living is an inspirational blog celebrating life’s simple pleasures, everyday mysticism, and delectable recipes that are guaranteed to stir the kitchen witch in you. If you enjoyed what you just read and believe that true magic is in the everyday, subscribe to my newsletter below for regular doses of enchantment. Want even more inspiration? Follow me on Instagram, Facebook, Pinterest, and Twitter. Here’s to a magical life!

Easy Homemade Dishwasher Detergent

In an effort to make my home eco-friendlier, I've begun making my own cleaning supplies. Not only is it cost-effective, but I feel like I'm taking care of myself and my planet by being more conscious about what I use to care for my home--including the dishes I wash.  

As a fan of home cooking--the ritual of preparing a nourishing meal and the health benefits of doing so--I can rack up a lot of dirty dishes just by spending an hour in the kitchen.  I've found that many green dishwasher detergents include unnecessary and, in some cases, harmful ingredients.  Thus was born my quest to find a more sustainable solution to the sinkful of dishes waiting for a good cleaning.  

This recipe for my eco-friendly dishwasher detergent is a love child born from mixes by Wellness Mama, Thank Your Body, and Overthrow Martha.  After months of testing, I found the perfect recipe that gets dishes clean and, with a little help from vinegar, sparkling.  An added bonus to this recipe is that, since you aren't buying packaged detergent, you are also cutting down on packaging waste.  I buy the ingredients in bulk and mix as needed, storing it in a mason jar.  

As with all my recipes, this one shouldn't take you more than a handful of minutes to whip up. Homemade anything is wonderful...as long as it isn't too labor intensive!

ingredients:

1 cup washing soda

1 cup citric acid

1 cup baking soda

1/2 cup sea salt

Combine all ingredients in a large mason jar (or another container) and shake vigorously.  Makes three cups (roughly 24 loads). Pour approximately 2 tablespoons per load.  Add vinegar in your dish washer's rinse compartment to avoid clouding on dishes.  Enjoy!

Enchantment Learning & Living is an inspirational blog celebrating life’s simple pleasures, everyday mysticism, and delectable recipes that are guaranteed to stir the kitchen witch in you. If you enjoyed what you just read and believe that true magic is in the everyday, subscribe to my newsletter below for regular doses of enchantment. Want even more inspiration? Follow me on Instagram, Facebook, Pinterest, and Twitter. Here’s to a magical life!

Two-Ingredient Laundry Detergent

I've fallen in love with homemade laundry detergent.  Why?  Because it's earth-friendly, cost-effective, easy to make and even easier to use.  With a few minutes and two simple ingredients, you've got yourself a great detergent that is gentle on your clothes, your wallet, and the planet. Still not convinced that homemade is better?  See what Wellness Mama has to say.

I avoided making any liquid laundry soaps because they are too labor intensive and more difficult to store.  I also chose a Borax-free recipe, because this ingredient is so controversial, as Crunchy Betty can tell you.  That, and I try to only use ingredients that I readily have on hand.  I'd rather use baking soda and castile soap than have to buy additional ingredients.  It reduces clutter and keeps things simple for me.

I adapted my recipe from ones by Thank Your Body and Mommypotamus, finding that the fewer the ingredients and the quicker the recipe, the easier it is for me to be eco-friendly.  This recipe makes enough detergent for about 50 loads at roughly 5 cents a load.  Of course, you can always double or triple the recipe to save yourself time and energy.  All in all, after using this on my clothes for six months now, I can never go back to traditional detergent.  

Ingredients:

1 bar Dr. Bronner's Castile Soap (5 ounces)

2 cups washing soda

Using a fine grater, grate the full bar of soap.  Mix with 2 cups washing soda in a bowl until combined.  To use, pour 1 tablespoon in washing machine before adding clothes.  Makes about 3 cups (48 loads of laundry).  Enjoy!

Enchantment Learning & Living is an inspirational blog celebrating life’s simple pleasures, everyday mysticism, and delectable recipes that are guaranteed to stir the kitchen witch in you. If you enjoyed what you just read and believe that true magic is in the everyday, subscribe to my newsletter below for regular doses of enchantment. Want even more inspiration? Follow me on Instagram, Facebook, Pinterest, and Twitter. Here’s to a magical life!

Thank Goodness It Ain't Maybelline Clear Mascara

About a year ago, I posted a recipe for my Thank Goodness it Ain't Maybelline Mascara made from beeswax, coconut oil, and activated charcoal--much safer and cheaper than your average drugstore beauty product.  It has all the effects of a quality mascara without the scary chemicals.  Yet even homemade mascara can be fated to cause the much maligned racoon eyes, natural enemies of a perfectly quaffed look, especially in the summer when the desert heat sets everything to melting and sweating.

With this in mind, I put together a clear mascara recipe for those hot summer days when you want to look a little extra polished but don't want to be constantly worrying about black circles around your eyes.  Like any clear mascara, it offers a little extra length and curl, but won't necessarily give you the high-drama of super long, dark lashes...which is just fine by me come summer time when the less makeup, the better.

The recipe is much the same as my black mascara, swapping out the charcoal for the aloe vera gel for added lightness.  The mix comes out slightly yellow in the tube because of the beeswax, but it does go on clear.  Make sure when you apply it to really comb through your lashes so the oil goes on evenly without clumping.  You should also run an eyelash comb through your strands to get a more even look.  You can recycle old mascara tubes for this or buy new ones here.

Ingredients:

2 tsp coconut oil


1/2-1/3 tsp grated beeswax


1 tsp aloe vera gel (optional)

Melt beeswax on low heat.  I do this by placing the wax in a clean tin can.  This tin can then goes in a saucepan with about one inch of water in it (see photo). Once the beeswax is melted, mix remaining ingredients into can and allow to melt.  Remove from heat and carefully pour liquid into your clean mascara tube.  I do this by pouring from a tin can that has been pinched on one end to create a spout (again, see photo) or by pouring the cooling mixture into a plastic bag that has a corner cut out of it.  Place the open corner of the bag inside the mascara tube and slowly push the liquid into the tube.  Allow to cool before using. Makes one tube.

Enchantment Learning & Living is an inspirational blog celebrating life’s simple pleasures, everyday mysticism, and delectable recipes that are guaranteed to stir the kitchen witch in you. If you enjoyed what you just read and believe that true magic is in the everyday, subscribe to my newsletter below for regular doses of enchantment. Want even more inspiration? Follow me on Instagram, Facebook, Pinterest, and Twitter. Here’s to a magical life!

3 Ways to Use Baking Soda and Vinegar to Clean Your Home

In my last post, I gave you a recipe for an all-purpose cleaner to show just how simple and affordable it can be to green your home care routine.  Today I'm going to add to this by showing you how you can use baking soda--that miracle pantry staple--and vinegar to take care of some of your bigger your cleaning needs.  Like my all-purpose cleaner that only used vinegar and essential oils, these easy recipes only cost you a fraction of what an organic cleaning product would and yet are as gentle on your home as they are on the earth.  In fact, using baking soda and vinegar to clean your home is even less expensive than buying those chemical laden commercial products!

1. For Your Toilet:  Pour 1 cup vinegar and 1/2 cup baking soda into the bowl.  Scrub thoroughly and let sit for 20 minutes. 

2. For the Bathtub, Kitchen Sink, or Other Tough to Clean Surface: 1/4 cup baking soda and about 1/8 cup water (enough to make a thin paste).  Combine ingredients until they form a thin paste and spread across desired surface.  Scrub until surface is clean and rinse off baking soda with warm water.  The baking soda will not only remove soap scum and other substances but also deodorize and disinfect.

3.  For a Clogged Drain: Pour 1/2 cup baking soda down the drain and 1 cup vinegar.  Cover drain so that the foaming action of the two ingredients stays in the pipes.  Let sit for half an hour then pour hot water down the drain.  This will clean out regular build up.

These are just a few ways to use such simple products on those hard-to-tackle places in our home that often need more elbow grease to get sparkly clean.  You can also use vinegar to deodorize your refrigerator (simply put an open cup of vinegar in your fridge for two days to absorb odors); placing an open box of baking soda near your trashcan will likewise get rid of any funky smells.  Between my all-purpose cleaner and these recipes, you can safely and cost-effectively clean your home!

Enchantment Learning & Living is an inspirational blog celebrating life’s simple pleasures, everyday mysticism, and delectable recipes that are guaranteed to stir the kitchen witch in you. If you enjoyed what you just read and believe that true magic is in the everyday, subscribe to my newsletter below for regular doses of enchantment. Want even more inspiration? Follow me on Instagram, Facebook, Pinterest, and Twitter. Here’s to a magical life!

All-Purpose Cleaning Spray

With Earth Day around the corner, I find myself thinking of all the super easy ways we can be eco-friendlier in our day to day routine, especially when it comes to cleaning our homes.  We often think that if we want to green our cleaning routines that we need to shell out a fortune on organic cleansers and other goods.  In reality, we can be good to our environment and our wallet by going back to basics.

This all-purpose cleaner does just that, using the anti-bacterial properties of vinegar to clean your home--a recipe I learned from my mom.  It can be used on everything from windows and bathroom sinks to the kitchen counter and floors.  I like to throw in essential oils into this mix, usually peppermint or lavender to soften the smell of vinegar.  What you're left with is a nice smelling all natural antibacterial cleaner that costs you under $1 a bottle. 

Ingredients:

1 cup vinegar

1 cup water

30 drops essential oil (optional)

Mix all ingredients in a spray bottle and shake until combined.  Enjoy!

Enchantment Learning & Living is an inspirational blog celebrating life’s simple pleasures, everyday mysticism, and delectable recipes that are guaranteed to stir the kitchen witch in you. If you enjoyed what you just read and believe that true magic is in the everyday, subscribe to my newsletter below for regular doses of enchantment. Want even more inspiration? Follow me on Instagram, Facebook, Pinterest, and Twitter. Here’s to a magical life!

DIY Seed Bombs

Nothing says spring like planting seeds or enjoying the beauty of bright flowers splashed across your backyard.  There is no better way to enjoy both delights than with these super easy seed bombs. What's a seed bomb, you might ask?  It's just what it sounds like: a ball of dirt and seeds that you can throw anywhere in your garden.  They make lovely gifts for spring celebrations like Easter--better than sugary confections.  They are a gentle way of bringing beauty to the lives (and yards!) of those you love. 

I used a mixture of organic flower seeds that would attract butterflies in my seed bombs because my little niece is in love with butterflies right now--and bright flowers.  Now she can have both in her backyard!  You can feel free to use any kinds of flower seeds you would like, however.  You can find the red clay at your local herb store or here (it's the same stuff you would use for a face mask).  Go easy on the water--just mix in a little at a time until the dirt and seeds are just wet enough to form balls otherwise you end up with soupy seed-sprouting mud.

Ingredients:

1 cup red clay

1/2 cup soil

1/4 cup seeds

Approximately 1/4 cup water

Mix all dry ingredients in a bowl and slowly, one tablespoon at a time, add the water until the mixture is just wet enough to form balls.  Then roll blend into one inch balls and let rest on a drying rack overnight.  Make sure there is plenty of air circulation--you want the dirt to dry or else the seeds will begin to sprout!  Makes about 9 seed bombs. 

image.jpg

Enchantment Learning & Living is an inspirational blog celebrating life’s simple pleasures, everyday mysticism, and delectable recipes that are guaranteed to stir the kitchen witch in you. If you enjoyed what you just read and believe that true magic is in the everyday, subscribe to my newsletter below for regular doses of enchantment. Want even more inspiration? Follow me on Instagram, Facebook, Pinterest, and Twitter. Here’s to a magical life!

DIY Ironing Spray Starch

I will be the first to admit that ironing is not always on my list of priorities.  As much as I love cleaning my house (and yes, I really *do* love it!), ironing is one of those things I always put off...so much so that I think I've only ever used my ironing board and iron maybe a dozen times in the past few years and only in dire need. 

Cut to me with a pile of dresses--absolutely adorable dresses, mind you--that I wanted to wear but hadn't because (you guessed it) they need to be ironed.  My default excuse was that I didn't have any starch to iron out all the wrinkles and smooth out the pleats of my clothes.  Then one day I bit the bullet and commit to an afternoon of ironing so that I could finally wear those dresses.  I even learned how to make my own spray starch so I wouldn't be tempted to put off my chore with my go-to excuse. 

Now here I am with a closet full of well-ironed clothes and a new addiction blooming: ironing!  Yes, it's true, I've fallen in love with the soothing routine and all because of making my own starch.  It is a simple mixture of cornstarch and water, but there is something about mixing up a batch (way cheaper and eco-friendlier than anything you'll get in the store) and spraying it across my wrinkled dresses feels so right.  Now I can't stop myself. 

And you should try it too.  All you need is a clean empty spray bottle and cornstarch, and you've got yourself a household miracle.  If you want a heavier starch, use more cornstarch--less, use less.  Use cold water here to keep cornstarch from clumping. 

Ingredients:

Heaping tablespoon cornstarch

1 pint cold water

Add ingredients to an empty spray bottle and shake well until cornstarch dissolves. Store in fridge.  Shake well before each use.  Enjoy wrinkle free clothes!

Enchantment Learning & Living is an inspirational blog celebrating life’s simple pleasures, everyday mysticism, and delectable recipes that are guaranteed to stir the kitchen witch in you. If you enjoyed what you just read and believe that true magic is in the everyday, subscribe to my newsletter below for regular doses of enchantment. Want even more inspiration? Follow me on Instagram, Facebook, Pinterest, and Twitter. Here’s to a magical life!

Thank Goodness It Ain't Maybelline Homemade Mascara

Seriously.  There's some scary stuff in regular mascara, and if you don't believe me just read what The Naked Label has to say about it!  Even some organic mascaras sneak in harmful preservatives.

So what's a mascara lovin' lady (or guy) to do?  Simple: make your own.  I know it sounds like one of those crazy hippy projects--and it is--but not only do you end up with a product as good as any store bought makeup (and safer to boot), but it also costs you a fraction of what quality organic mascara does.  I would typically spend $15-$20 for a good mascara.  The cost of making one tube of your own is about $1-$2, maybe $4 tops if you splurge and buy your own $2 mascara tube online instead of recycling your old ones. 

The only potential downside to DIY mascara is that it's not out and out waterproof--you need synthetic stuff for that.  However, I find that if you add more beeswax, you get a product that is less likely to smudge under duress (rain, Lifetime Original movies, cute puppies--anything that brings on the waterworks).

So here is my recipe for homemade mascara, which I adapted from Thank Your Body, Ditch the Wheat, and Wellness Mama.  Ingredients can be found at your local health food store or herb store.

Ingredients: 

2 tsp coconut oil


1/2-1/3 tsp grated beeswax


1 tsp activated charcoal (or 2-3 capsules)

Melt beeswax on low heat.  I do this by placing the wax in a clean tin can.  This tin can then goes in a saucepan with about one inch of water in it (see photo).  Once the beeswax is melted, mix the coconut oil into the tin can and let it melt and combine with the beeswax.  Once the ingredients are in liquid form, gently stir in the activated charcoal.  Remove from heat and carefully pour liquid into your clean mascara tube.  I do this by pouring the cooling mixture into a plastic bag that has a corner cut out of it.  Place the open corner of the bag inside the mascara tube and slowly push the liquid into the tube (see Thank Your Body above for pictures of this).  Allow to cool before using.

Enchantment Learning & Living is an inspirational blog celebrating life’s simple pleasures, everyday mysticism, and delectable recipes that are guaranteed to stir the kitchen witch in you. If you enjoyed what you just read and believe that true magic is in the everyday, subscribe to my newsletter below for regular doses of enchantment. Want even more inspiration? Follow me on Instagram, Facebook, Pinterest, and Twitter. Here’s to a magical life!